G.T. Fieros

Greater Toronto Fieros
It is currently Fri Apr 19, 2024 5:56 pm

All times are UTC - 5 hours [ DST ]


Post new topic Reply to topic  [ 291 posts ]  Go to page Previous  1 ... 8, 9, 10, 11, 12, 13, 14 ... 20  Next
Author Message
PostPosted: Thu Mar 19, 2015 5:14 am 
Offline
Single again

Joined: Sun Nov 10, 2013 11:26 am
Posts: 292
Location: Kitchener, Ontario, Canada
I'm aiming for a clean engine bay. With having said that, the battery will be relocated to a better area. What better way than to move it under the passenger side head lamp. This consists of making a battery tray, removing the area under the headlight and bolting in the tray. I used 1/8" aluminum for this project and yes, the stock battery hold down bracket will be reused, it's not shown in the photos though.

Note: I'm using the GT fascia. (This battery box will be hidden by this fascia). Non Aero cars might not be able to get away with this mod as the battery may interfere with the plastic.

Image

Image

Image

Image

Image

Image

Image

Image

Passenger side head lamp assembly.
Image

After removal.
Image

Cut the sheet metal and you're left with a hole.
Image

Trim these two studs a little as they interfere with the battery box flange.
Image

Now is a good time to paint the area since it's exposed.
Image

Secure battery box with 1/4" hardware.
Image

Image


Top
 Profile  
 
PostPosted: Tue Mar 24, 2015 3:36 pm 
Offline
Guru

Joined: Fri Jan 18, 2013 12:24 pm
Posts: 727
Location: Just North of the GTA, Ontario
clean work as usual ;)
what are you going to do with lighting then?
and how would you be able to access the batt for r&R when needed?

just curious :)


Top
 Profile  
 
PostPosted: Tue Mar 24, 2015 7:46 pm 
Offline
Single again

Joined: Sun Nov 10, 2013 11:26 am
Posts: 292
Location: Kitchener, Ontario, Canada
OHNIKO wrote:
clean work as usual ;)
what are you going to do with lighting then?
and how would you be able to access the batt for r&R when needed?

just curious :)


Thanks for commenting Nick.

From the floor of the battery tray to the lowest part of the headlight assembly (in its lowest, parked position) is 8 3/4". My battery is 7 3/8" in height. Therefore I have 1 3/8" of clearance.
As for servicing the battery, I'll look into a quality unit that needs little maintenance. Perhaps a sealed unit from Optima. Either way, it's only a few minute job to remove the headlamp assembly if needed.

Here's two more pictures.
Despite not showing the battery in position, here you can see the clearance.
Image

If I remove the curved steel from the bottom of the fascia, I can bolt that area to the battery box. (That should be a good indication of how low my battery box sits).
Image


Top
 Profile  
 
PostPosted: Wed Mar 25, 2015 2:10 pm 
Offline
Guru

Joined: Fri Jan 18, 2013 12:24 pm
Posts: 727
Location: Just North of the GTA, Ontario
thanks !

tres cool :)


Top
 Profile  
 
PostPosted: Thu Apr 02, 2015 1:32 pm 
Offline
Addict

Joined: Thu Jan 17, 2013 7:16 am
Posts: 160
Today being a warm day, I decided to try and get the "88 GT started, as I have to take it for a drive clean test. It started right away, I took it for a ride round the block. Some time next week I will be taking it for the drive clean.


Top
 Profile  
 
PostPosted: Fri Apr 03, 2015 9:15 pm 
Offline
wannabe
User avatar

Joined: Sat Jan 19, 2013 1:27 pm
Posts: 83
Location: Alliston (Just a short ride North of Toronto)
April 1st I took my Fiero to work, it will be my daily driver until winter comes next December. So happy to be back in her. (Hold the "That's what she said!" Jokes lol)
After a winter of sleep she started up no problem at all. I'm planning to dip my car sometime this spring to test out yellow for a color and to see just how good plasti dip really is.

_________________
SaturnTO
Alliston
Ontario


Last edited by SaturnTO on Mon Apr 06, 2015 11:11 pm, edited 1 time in total.

Top
 Profile  
 
PostPosted: Mon Apr 06, 2015 9:05 pm 
Offline
wannabe
User avatar

Joined: Fri Mar 28, 2014 4:08 pm
Posts: 87
Location: London, ON
Just finished installing some odds and ends from Rodney Dickman. Short shifter is definitely a change in feel.

SaturnTO wrote:
I'm planning to dip my car some this spring to test out yellow for a color and to see just how good plasti dip really is.


I'm really interested in your experience with this.


Top
 Profile  
 
PostPosted: Tue Apr 07, 2015 5:40 am 
Offline
Addict

Joined: Thu Jan 17, 2013 7:16 am
Posts: 160
Yesterday I took my '88 for an emission test, it passed easily. Now to get the sticker.


Top
 Profile  
 
PostPosted: Tue Apr 28, 2015 10:46 pm 
Offline
Fieronut

Joined: Wed Jan 16, 2013 7:56 pm
Posts: 822
Location: Toronto
Today, not much, past couple of months is another story. Won't say anything right now other then I wasn't happy with the car so I got a little involved to do some repairs & fix a few things I've been putting off. Reason why I haven't been on the road yet this year. Should be all back together by end of May.

Those who know how deep I'm going with it (a couple) keep you to yourself for the time being ;) :mrgreen:


Image

Image

She will be back together soon enough :cry:


Top
 Profile  
 
PostPosted: Wed Apr 29, 2015 10:03 am 
Offline
Addict

Joined: Thu Jan 17, 2013 7:16 am
Posts: 160
Hello Adam,
You can use one of my cars in the mean time.


Top
 Profile  
 
PostPosted: Wed Apr 29, 2015 7:39 pm 
Offline
Single again

Joined: Sun Nov 10, 2013 11:26 am
Posts: 292
Location: Kitchener, Ontario, Canada
I did a "Big Brake Booster How To" write up for those interested in doing so. It's in the Construction Zone.
http://www.gtfieros.com/phpBB3/viewtopic.php?f=7&t=672&p=3882#p3882


Top
 Profile  
 
PostPosted: Wed Apr 29, 2015 7:59 pm 
Offline
Single again

Joined: Sun Nov 10, 2013 11:26 am
Posts: 292
Location: Kitchener, Ontario, Canada
I started working on the car a little again. This time, the front of the car got a little attention.

Since I had used parts, they must be disassembled, cleaned and inspected before going into service.
88 rack disassembled, cleaned and inspected.
Image

Clean parts and new brass bushing.
Image

Stake the inner tie rod. You can also see the generous amount of grease.
Image

Brass bushing correctly installed, more grease and yes, I painted the rack while it was apart.
Image

The brass bushing, when installed correctly, sticks out 8 mm as seen. I used 3 rivets 120° apart.
Image

Index marks for setting the pinion tension.
Image

Bellows and rubber mounts installed on the now clean rack.
Image

Image

Painted the rack hold down brackets.
Image

I removed the spare tire tub for better access.
Image

See, more room.
Image

88 specific steering shaft.
Image

This flexible cover from the 84 doesn't fit the 88 intermediate shaft because of the rag joint. I'll have to look into finding the correct one.
Image

Rack installed. The original nuts on the backside of the crossmember were missing. I chose 3/8"-16 x 1" zinc plated with Nylock nuts.
Image

Since the factory shop manual, nor Rodney's instructions mention the torque of nut #7, I'm going with the 28-40 ft-lb scale since it's an M10x1.5 nut.
Exploded view from FSM.
Image


Last edited by Lunatic on Fri May 01, 2015 5:34 am, edited 2 times in total.

Top
 Profile  
 
PostPosted: Thu Apr 30, 2015 5:29 am 
Offline
Addict

Joined: Mon Jan 21, 2013 11:37 pm
Posts: 189
Hey Shayne! I never knew you had such a nice rack ..LOL

I have a spare 88 Factory service manual. Let me know if you want it and I can drop it of


Top
 Profile  
 
PostPosted: Tue May 12, 2015 7:17 pm 
Offline
Single again

Joined: Sun Nov 10, 2013 11:26 am
Posts: 292
Location: Kitchener, Ontario, Canada
And today, the rear window was re-installed.

Image

Image

Image

Image

Image

Image

Image

Image

Image


Top
 Profile  
 
PostPosted: Sat May 23, 2015 3:48 pm 
Offline
Single again

Joined: Sun Nov 10, 2013 11:26 am
Posts: 292
Location: Kitchener, Ontario, Canada
Moving forward, I was eager to get the front suspension reinstalled. I took the stock 84 springs and cut 1.5 coils off both springs. I used an angle grinder with a thin cut-off wheel. Yes, you could also use torches but let them cool naturally and do not quench them in water! Then followed a visit to the sandblaster to remove years of crud. Then a little paint.
Image

Image

Cleaned the outer tie rods since they were in great shape.
Image

A little paint and new boots, and they're ready to go.
Image

The stock front 88 sway bar bracket has a little slope to it.
Image

Stock bracket on the left, aftermarket one, with poly bushing on the right.
Image

Reassembly begins.
Image

Image

Image

Image

At this point, I decided to make my own flex lines and take a break from all the paint fumes.
This was relatively easy to do as I've done it before on my motorcycle. Having left over material from that endeavor, all I needed was the fittings. The local speed shop had these. Anyhow, here's the end result.
The lines I've seen for sale were all around 18" long. I didn't like that length as it seemed a little too short for my liking.
So, I chose to make mine 24" long.
TFS line on top, mine on the bottom.
Image

Image

I like to finish off the end by putting heat shrink tubing over the outer casing.
Image

Image

Since the finish on the 18" wheels was in sad shape, the sandblaster makes short work of removing all the old powder coating. Now they're ready for some colour! Off for coating next week.
Image

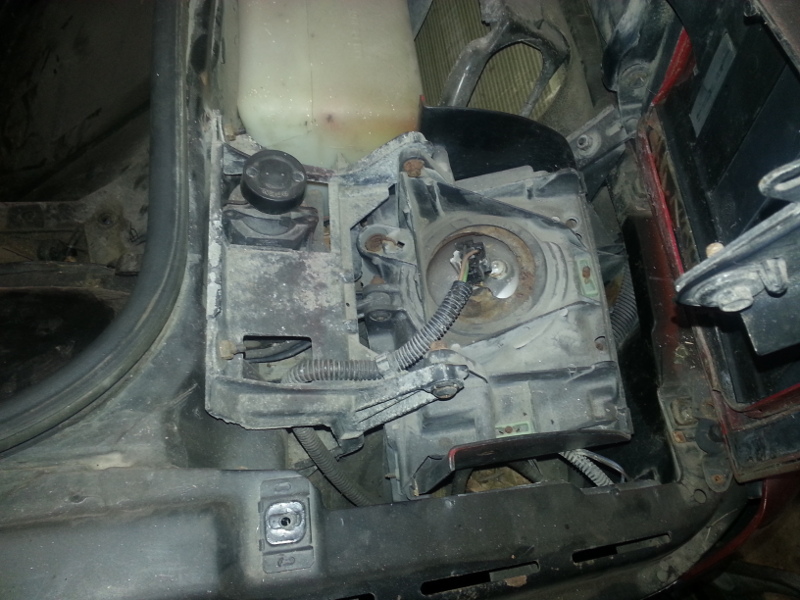
Oh yeah, a 2002 Northstar dropout was in the classifieds. It ended up following me home. You never know when I'll need it.
Image


Top
 Profile  
 
Display posts from previous:  Sort by  
Post new topic Reply to topic  [ 291 posts ]  Go to page Previous  1 ... 8, 9, 10, 11, 12, 13, 14 ... 20  Next

All times are UTC - 5 hours [ DST ]


Who is online

Users browsing this forum: No registered users and 2 guests


You cannot post new topics in this forum
You cannot reply to topics in this forum
You cannot edit your posts in this forum
You cannot delete your posts in this forum
You cannot post attachments in this forum

Search for:
Jump to:  
cron
Powered by phpBB® Forum Software © phpBB Group